
Whether it’s due to age, damage, or a desire for an upgraded look, replacing a sliding glass door is a project many homeowners face. But how complicated is it really? If you’ve been searching for how to replace a sliding glass door, this detailed guide covers everything from tools to safety tips and installation techniques. Whether you’re a DIY enthusiast or planning to hire a professional, understanding the process is crucial for smooth execution and lasting results.
Understanding the Sliding Glass Door Structure
Before diving into the replacement process, it’s essential to understand the basic structure of a sliding glass door. Typically, these doors are made of two or more large glass panels — one fixed, and the other designed to slide on rollers within a track. The door system includes tracks, rollers, frames, locks, and often a screen door.
Components of a Sliding Glass Door
Knowing these components will help you disassemble the old door and install the new one with confidence.
Glass Panels are the main visual and structural elements of a sliding glass door. Typically made from tempered safety glass, they are designed to resist breakage and enhance both security and energy efficiency.
Frame forms the skeleton of the door and holds the glass panels in place. It is commonly made of materials like vinyl, aluminum, fiberglass, or wood, offering different levels of durability, insulation, and aesthetic appeal.
Track is the horizontal base or guide rail along which the sliding panel moves. Located at the bottom of the frame, it ensures smooth and aligned movement when opening or closing the door.
Rollers are small wheels attached to the bottom of the sliding panel that glide along the track. They play a crucial role in enabling effortless and quiet operation of the door.
Lock Mechanism secures the sliding glass door when closed and usually includes a simple latch or more advanced keyed locking system. It helps ensure the safety of the home by preventing unauthorized access.
Signs It’s Time to Replace Your Sliding Glass Door
Wondering if you should repair or replace your sliding glass door? Here are the red flags:
- Persistent draft or leaks are clear signs that your sliding glass door is no longer sealing properly. This not only makes your indoor space uncomfortable but also leads to higher energy bills as your heating or cooling system works harder.
- Cracked or foggy glass indicates damage or a broken seal in double-pane windows, which affects both the door’s appearance and insulation. Fog between the panes suggests moisture intrusion, reducing visibility and energy efficiency.
- Door sticks or falls off track due to worn-out rollers, debris buildup, or frame warping. This makes the door hard to operate and can even be a safety hazard if the panel becomes unstable or detached.
- Broken locking mechanisms compromise your home’s security, leaving your space vulnerable to intrusions. A lock that doesn’t function correctly should never be ignored and often signals the need for full door replacement.
- Outdated style affecting home aesthetics can make your entire living space look less appealing and may even lower property value. Modern sliding glass doors offer sleek designs and better functionality, instantly refreshing your home’s look.
If these issues sound familiar, a replacement might be more cost-effective than repeated repairs.
Tools and Materials You’ll Need
Proper preparation begins with gathering the right tools. Here’s a checklist for a typical sliding glass door replacement:
| Tools | Materials |
|---|---|
| Screwdrivers (Phillips and flathead) | Replacement sliding glass door |
| Pry bar | Insulation foam or backer rod |
| Level | Shims |
| Tape measure | Exterior-grade caulking |
| Cordless drill | Caulk gun |
| Utility knife | Weatherstripping |
| Safety gloves and glasses | Flashing tape |
Having everything at hand ensures a smoother and faster installation process.
Measuring for a New Sliding Glass Door
Before ordering your new door, you’ll need to accurately measure the existing space.
- Width: Measure the distance between the inside edges of the side jambs.
- Height: Measure from the top jamb to the sill.
- Depth: Check if the new frame will fit the thickness of the wall.
Always double-check your measurements and verify with the manufacturer’s sizing chart.
Removing the Old Sliding Glass Door
Start by removing the movable panel:
- Lift it upward and pull the bottom inward to remove it from the track.
- If stuck, remove the screws holding the rollers and gently wiggle it free.
Then, remove the fixed panel:
- Locate and remove any brackets holding it in place.
- Carefully pry it loose and slide it out.
Finally, remove the existing frame:
- Unscrew and remove the interior and exterior trim.
- Use a pry bar to pull out the frame, being cautious not to damage the surrounding wall.
Dispose of the old door properly or recycle the glass and aluminum if applicable.
Preparing the Opening for Installation
With the old door removed, it’s time to prep the opening:
- Inspect the sill for water damage or rot to ensure the structural integrity of your doorway before installing the new sliding glass unit. A compromised sill can weaken the support and allow moisture to seep into your home, leading to further deterioration over time.
- Use flashing tape to seal the opening and prevent future leaks by creating a waterproof barrier around the frame. This helps direct any water away from vulnerable areas, reducing the risk of mold, mildew, and structural damage in the future.
- Apply foam insulation or backer rod around gaps for thermal efficiency to fill voids between the new door frame and the surrounding wall. This step improves energy efficiency by blocking drafts and heat loss, helping maintain a comfortable indoor temperature year-round.
Level and square the opening using a spirit level and adjust with shims if needed. This step is crucial for smooth sliding and door longevity.
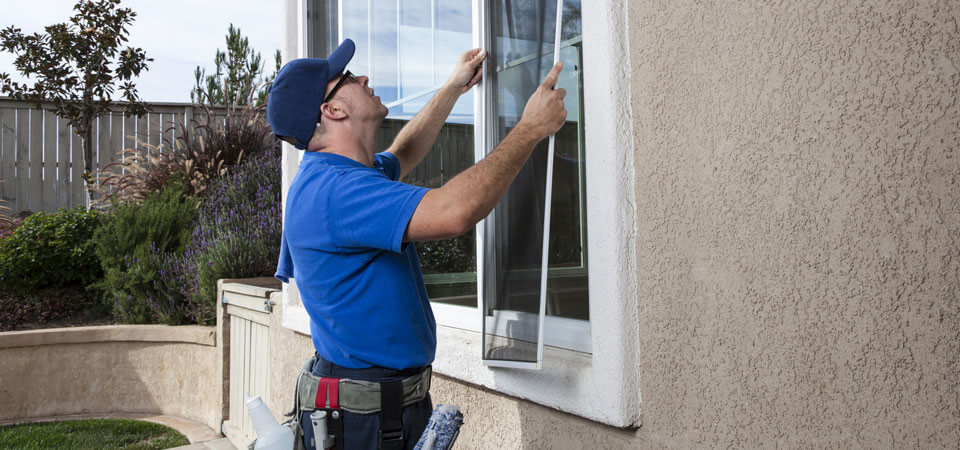
Installing the New Sliding Glass Door
Carefully lift the new frame into the opening:
- Ensure it’s centered and aligned with the exterior wall surface.
- Secure it loosely with screws, then check for level and plumb.
- Tighten screws and fill gaps with shims.
Next, install the fixed glass panel first, followed by the movable panel:
- Fit the rollers onto the track and ensure smooth sliding.
- Install the screen panel if included.
Finish by checking the lock alignment and adjust as necessary for secure closure.
Sealing and Finishing Touches
To prevent drafts and moisture intrusion, seal the edges:
Apply exterior-grade caulk along the door frame to seal any remaining gaps and prevent moisture, pests, and drafts from entering your home. This weatherproof barrier also enhances the energy efficiency and durability of your new sliding glass door.
Install trim or molding to cover the frame gaps for both functional and aesthetic purposes. It not only hides imperfections and uneven edges but also adds a finished, polished look that blends the new door seamlessly with your interior or exterior décor.
Add weatherstripping to improve insulation and reduce noise by sealing the movable panel against the frame when closed. This step is essential for blocking out drafts, maintaining indoor temperature, and minimizing outside noise intrusion.
Let the caulking cure fully before exposing the door to water or heavy use.
Post-Installation Maintenance Tips
Routine maintenance will help extend the life of your new sliding glass door.
Lubricate rollers and track every six months to ensure the door glides smoothly and quietly without sticking or jumping. Regular lubrication reduces wear on moving parts and prolongs the life of both the rollers and the track system.
Check for debris and clean the track regularly to avoid obstructions that can cause the door to jam or derail. Dirt, leaves, and other buildup can damage the rollers and make the door difficult to open or close.
Inspect caulking annually and reapply if it begins to crack or peel to maintain a watertight seal around the frame. Fresh caulking helps prevent moisture intrusion, mold growth, and energy loss through air leaks.
Sliding Glass Door Safety Tips
Use tempered or laminated safety glass if replacing glass only to minimize the risk of serious injury in case of breakage. These types of glass are specifically designed to shatter into small, less harmful pieces or stay intact under impact, making them much safer for home use.
Always wear protective gear when handling glass panels such as safety gloves, goggles, and long sleeves. Handling large panes of glass can be dangerous, and the right gear protects you from sharp edges, unexpected breaks, or splinters.
Have someone assist you during installation to prevent accidents or damage because sliding glass doors are heavy, fragile, and unwieldy to move alone. An extra pair of hands helps steady the frame, guide alignment, and reduce the chance of dropping or cracking the glass.
Common Mistakes to Avoid
Attention to detail ensures professional-quality results.
- Improper measurements are one of the most frequent causes of failed sliding glass door installations. If your measurements are even slightly off, the new door may not fit correctly, leading to poor sealing, alignment issues, or the need for costly adjustments.
- Skipping leveling the frame can result in a door that sticks, won’t slide smoothly, or places uneven pressure on the rollers and track. Over time, this can warp the frame, damage the door components, and drastically shorten the lifespan of your new sliding glass door.
- Poor sealing leaves your home vulnerable to drafts, moisture, and insect intrusions. Without a tight seal around the door frame, you’ll likely experience higher energy bills, reduced comfort, and even potential water damage during storms or heavy rain.
Should You Hire a Professional?
While replacing a sliding glass door is a manageable DIY task, hiring a professional is recommended if:
You’re uncomfortable handling glass, which is heavy, fragile, and difficult to maneuver, especially in large panels like those found in sliding doors. If you lack experience or confidence, hiring a professional reduces the risk of accidents, injury, or costly damage.
Structural adjustments are needed, such as resizing the opening or repairing damaged framing, which go beyond basic DIY skills. These modifications require expert knowledge of building codes and structural integrity to ensure the new door fits safely and securely.
Electrical or alarm systems are tied to the door frame, and tampering with them without proper expertise can lead to system malfunctions or safety hazards. A licensed installer can safely disconnect and reconnect these systems while ensuring your home remains secure and up to code.
A certified contractor guarantees safe, code-compliant installation.
Cost Breakdown: DIY vs. Professional Installation
| Expense | DIY Cost | Pro Cost |
|---|---|---|
| Door Unit | $500–$1,200 | $500–$1,200 |
| Tools/Materials | $100–$200 | Included |
| Labor | $0 | $400–$1,000 |
| Total | $600–$1,400 | $900–$2,200 |
While DIY saves money, pros deliver faster, often warrantied work.
Environmental Impact of Sliding Glass Doors
Modern sliding glass doors improve energy efficiency:
- Low-E coated glass reduces heat transfer by reflecting infrared and ultraviolet rays, keeping your home cooler in summer and warmer in winter. This invisible coating helps maintain indoor comfort while lowering energy consumption and utility costs.
- Double-pane units insulate better by trapping air or inert gas between two glass layers, creating a thermal barrier that minimizes heat loss and reduces outside noise. This extra insulation makes your home more energy-efficient and eco-friendly throughout the year.
- Durable materials like fiberglass reduce long-term waste because they resist warping, rotting, and corrosion, resulting in fewer replacements over time. Choosing long-lasting frame materials not only lowers maintenance but also decreases landfill contributions and environmental impact.
Choosing ENERGY STAR-certified models can lower utility bills and your carbon footprint.
Enhancing Home Value and Curb Appeal
A new sliding glass door boosts resale value by:
Improving natural light and indoor-outdoor flow transforms both the look and feel of your living space, making rooms appear larger, brighter, and more inviting. Sliding glass doors create a seamless transition between your interior and outdoor areas, enhancing both functionality and lifestyle appeal.
Offering better insulation and noise reduction makes your home more energy-efficient and peaceful, thanks to modern glazing technologies and insulated frames. This means lower utility bills, a quieter indoor environment, and increased comfort year-round—important selling points for potential buyers.
Creating a modern, sleek aesthetic instantly updates the appearance of your home by replacing bulky, outdated doors with clean, minimalist lines. This contemporary style not only complements modern decor trends but also boosts curb appeal and overall property value.
It’s one of the most impactful upgrades for kitchens, patios, and sunrooms.
FAQs
How long does it take to replace a sliding glass door?
A DIY project can take 4–6 hours, while professionals usually complete the job in 2–3 hours.
Can I just replace the glass in a sliding glass door?
Yes, if the frame is in good condition, you can replace only the glass panel to fix cracks or upgrade to energy-efficient glass.
What is the best material for a sliding glass door frame?
Vinyl and fiberglass are energy-efficient and low-maintenance, while aluminum is durable but less insulating.
Do all sliding glass doors open the same way?
No, some slide left-to-right, others right-to-left. Choose a model that fits your layout and convenience.
Is replacing a sliding glass door worth it?
Yes, it improves energy efficiency, security, appearance, and functionality.
What size sliding glass door do I need?
Standard sizes are 72″ x 80″, 96″ x 80″, etc. Always measure your rough opening to determine the exact size needed.